Procedural Notes
- Best results for a short, sharp pulse. I used an aluminum rod tapped on the lab table directly beneath the mouth of the tube and the microphone. It takes a few trials to get a clear pulse/reflection signal. Not every trial will be useful data, especially if the background noise is high. I was able to get useful data with music playing in the background (about 70dB about 1.5m away), but not if I was singing along 40cm from the mic.
- Set the microphone trigger level to 0.01. Any higher, and it might not trigger with the pulse. Lower, and it will trigger randomly with background noise.
- Extracting the time data can be frustrating with the stylus; the small screen means it is hard to tap exactly on the data point you want. You can instruct students to re-scale the time axis of the graph: default scale is 0 to 0.03 seconds. For the 90cm tube, the travel time is about 5ms, so scaling 0 to 0.01 should give you the pulse and reflection.
- Time data can also be read directly from the data table. Look for the highest pressure spikes (spikes should be significantly higher than background) and just record the corresponding time form the table.
- A good trial may have three or even four measurable spikes; students can measure multiple spikes from a single data run.
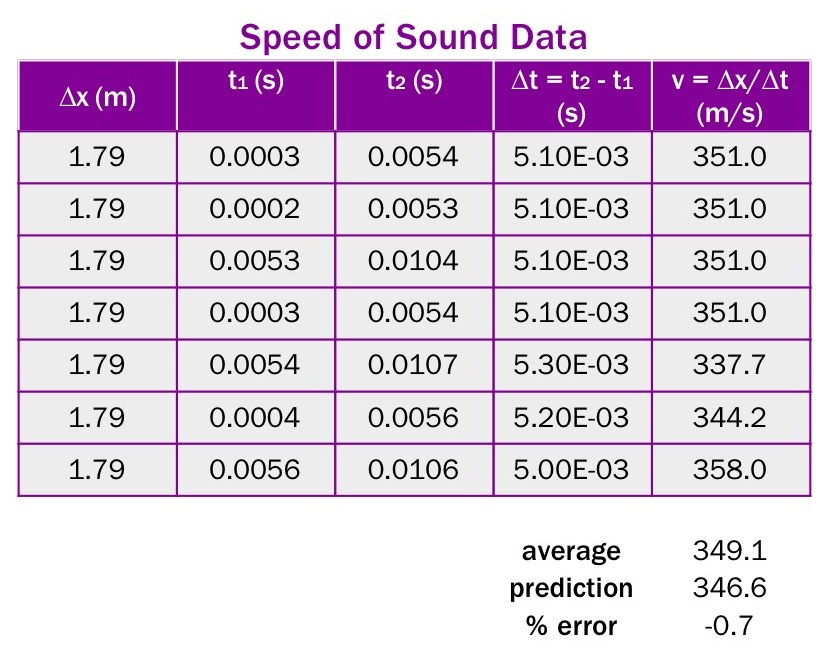
- My tube was .895m long (corked). The calculated travel time for the pulse was 5.17ms. My data consistently measured travel times at 5.1 or 5.2 ms.
- My final results were almost perfect; average speed = 349 m/s, compared to the predicted 346.6 m/s (the room was very warm, 26°C).